Once you have WordPress and the Bridge Theme installed, you’re required to install the necessary plugins to successfully run our theme on your website (WPBakery, Envato Toolkit and LayerSlider).
2. Getting Started
Important note: Starting from the Bridge update 18.0, please make sure to install the ``Bridge Core`` plugin, since this plugin is of critical importance for proper theme functioning. This plugin includes core theme functionalities and custom post types that come with the theme (Portfolio, Testimonials, etc.), and without this plugin you will not be able to create any of these custom post types or the elements in the theme that require them. To achieve this, either navigate to Plugins > Installed Plugins, and activate the “Bridge Core”, or alternatively go to Appearance > Install Plugins, and install and activate the “Bridge Core” from there. Additionally, after installing future Bridge theme updates, the “Bridge Core” plugin may require manual updating, which you can perform by locating the plugin in Plugins > Installed Plugins.
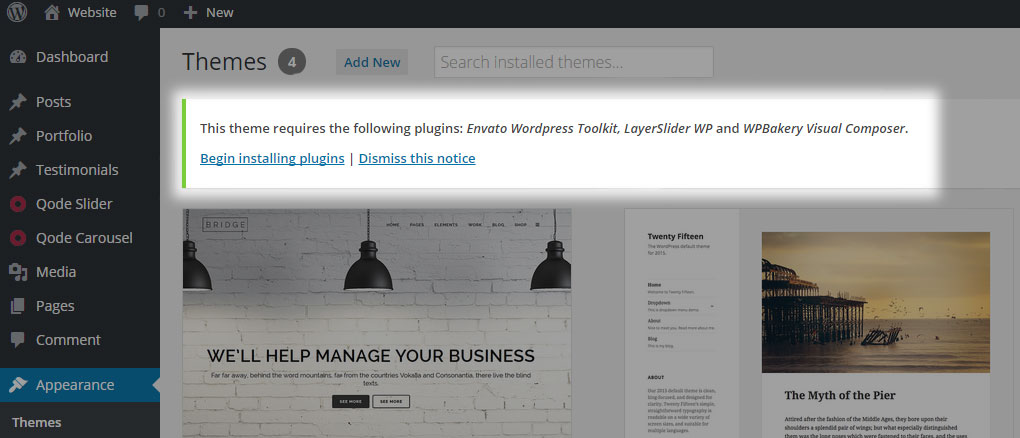
Upon installing and activating Bridge in WP Admin -> Appearance -> Themes you will get a notice at the top of your admin panel saying that the theme requires certain plugins. Click on Begin installing plugins.
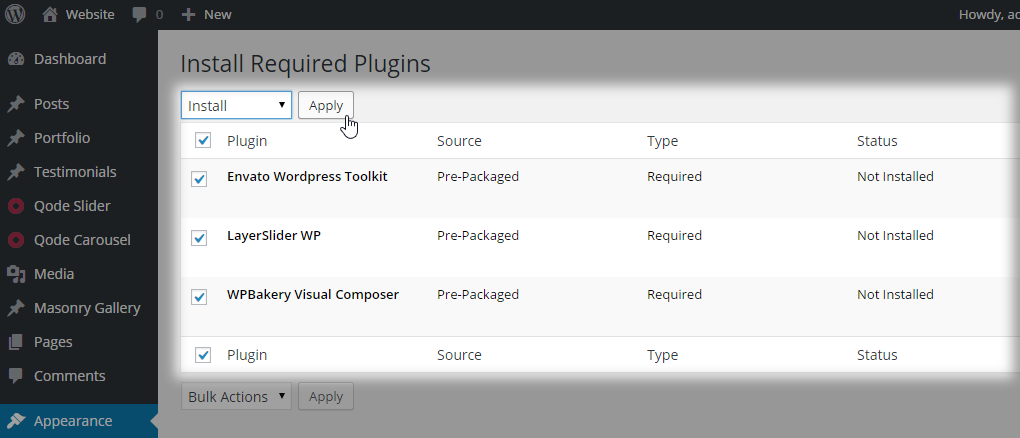
WordPress redirects you to the Install Required Plugins page. Select all plugins, choose Install and click Apply.
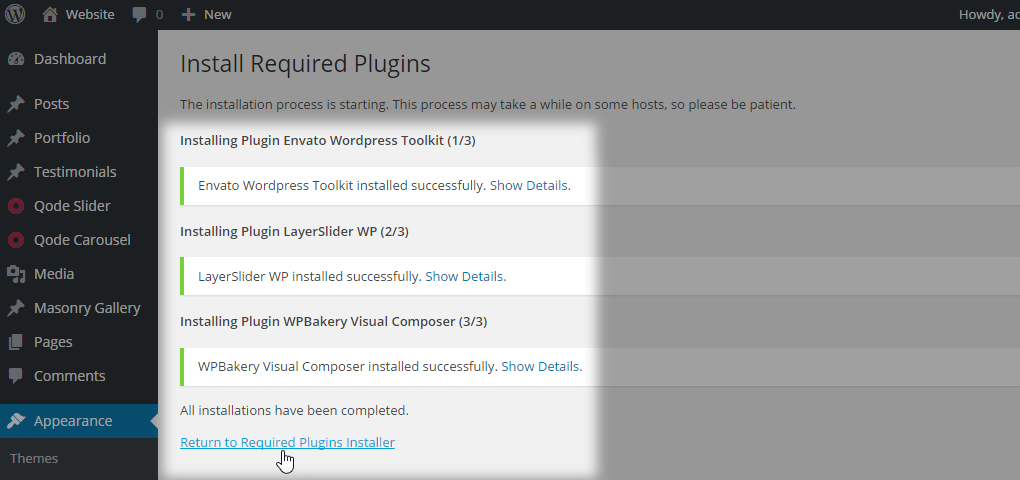
Once the installation is complete the following screen will appear. Click Return to Required Plugins Installer in order to activate these plugins and have them included into the Bridge theme.
Note: LayerSlider is a recommended plugin. Meaning that, if you’re not using a demo of our theme that has incorporated this plugin, or you’re not going to use this plugin when creating your own content, you can omit its installation and save space on your server.
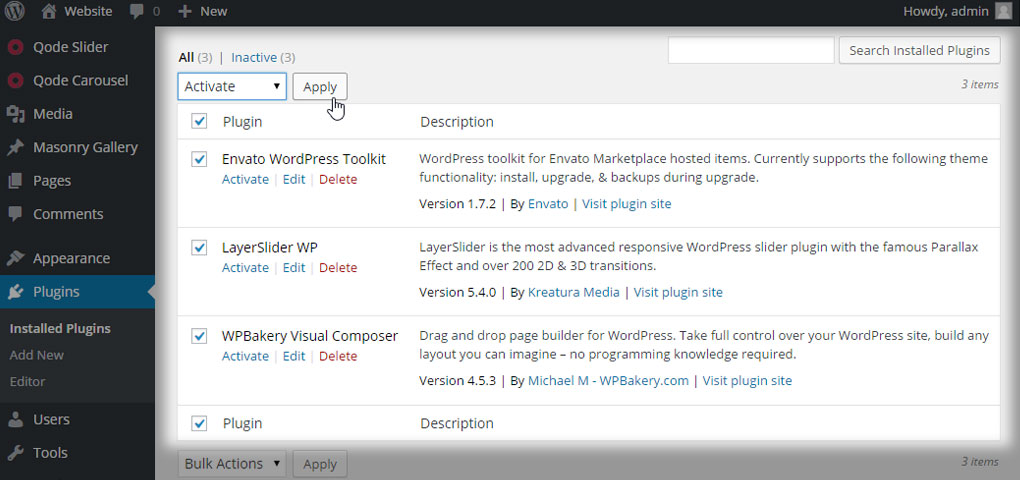
Back on the Installed Required Plugins page, select all the installed plugins, choose Activate, and click Apply.
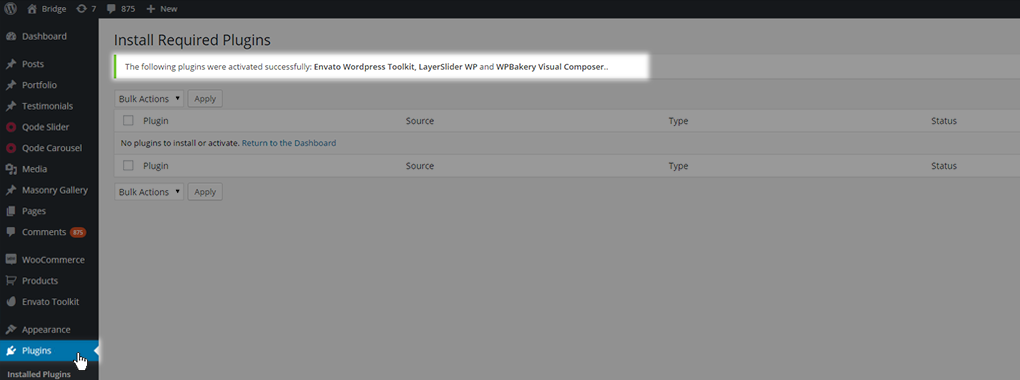
Click Return to Dashboard.
Congratulations! You have successfully installed the plugins required to run the Bridge theme on your site. Proceed to import a demo, take a look at our quick setup guide, or create your own content.
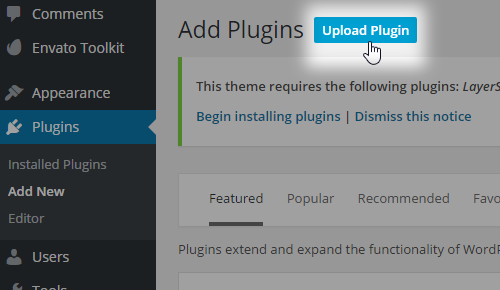
Regardless of the fact which demo you are using, you can easily upload and activate any of the plugins which comes with Bridge (e.g. Qode Listing, Qode Music, Qode News, etc.). To achieve this please navigate to Plugins > Add New, where you will see an Upload Plugin button at the top left of the screen. After this you should click the Browse button.

Next you should locate the plugin you are looking for. The plugins can be found by navigating to Bridge Main Files folder and extracting the contents of the bridge folder. Here you will find the plugins folder with zip files containing each of the plugins. Simply pick the plugin you wish to upload.

A few moments later the upload process will have finished and you will see the Install Now button next to the plugin in the admin.

After a short while the installation process will have finished as well and all that’s left is to click the Activate button. This rounds up the entire process and you’re all set.
RELATED LINKS:
2.1 Server – recommended settings / requirements
To successfully run our theme on your website we recommend a certain PHP and WordPress configuration setting:
PHP 7.4.X OR HIGHER
To check the PHP version running on your server please follow these steps:
01 Create a simple Text Document file and place the following content in it:
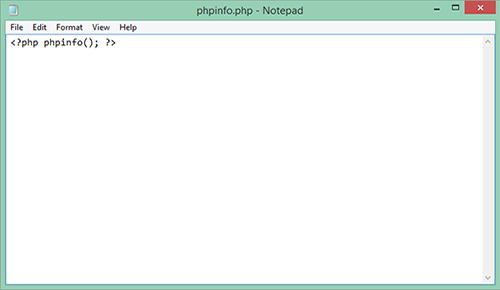
02 Save the file as phpinfo.php
03 Using your file manager or FTP client place the file in the WordPress installation folder on your server
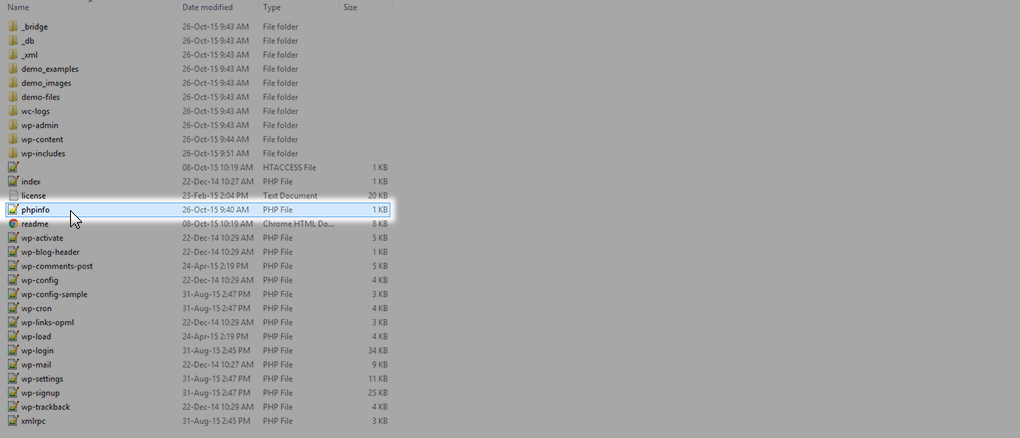
04 Go to your homepage and add ‘/phpinfo.php‘ to your site URL and hit Enter
If your PHP version is lower than 7.4.x please contact your hosting service provider to have them increase the PHP version on your server.
Additionally, you can install and activate WP-ServerInfo plugin and check your server settings, it can be found in Dashboard plugins repository or on this direct link:
MEMORY LIMIT 128M OR HIGHER
You can have a closer look at how to increase the PHP memory limit here.
MAX UPLOAD SIZE 128M OR HIGHER
You can have a closer look at how to increase the PHP Max Upload Size here.
MAX EXECUTION TIME 300
POST MAX SIZE 256M
Note that the post max size needs to be equal or higher than the max upload size
Optional settings for php.ini file:
- post.max_vars = 5000
- request.max_vars = 5000
If you happen to need any assistance when it comes to checking your server configuration, our support team is here to advise you. Also, we recommend referring to your hosting service for more in-depth guidance.
Related Links
https://wordpress.org/hosting/
* Hosting providers recommended by the WordPress community
https://qodeinteractive.com/magazine/wordpress-maximum-upload-size/
WPBakery Not Working - Content Decoding Error
If WPBakery does not load for you in the back-end while you are attempting to edit a page, please first make sure that both your theme and the WPBakery plugin are updated to their latest versions available. Here are some useful guidelines for achieving this:
Here is what you can do if you are getting any of the following messages when accessing your site or editing pages:
- Failed to load resource: net::ERR_CONTENT_DECODING_FAILED
- customlibEditGalleryjava script error in the console when you open developer tools in Google Chrome
- not found 404 page is displayed when editing pages
Add following line to WordPress .htaccess file:
SubstituteMaxLineLength 10m
You can put this line at the end of the file, after the # END WordPress line:
https://ticksy_attachments.s3.amazonaws.com/2527160315.jpg
2.2 Installing WordPress
If you’ve recently purchased a hosting plan and a domain name, the next step is to install WordPress CMS on your server. Here are a few links to help you start your website’s back-end and get your site ready for installing Bridge:
Video tutorial on how to install WordPress - https://youtu.be/_05NUFKObqA
Note: We strongly advise using the latest version of WordPress available.
If you plan on using our theme on a local WordPress development and migrating your site live later on, this is a useful link that shows how to create a local WordPress development environment - https://wpklik.com/wordpress-tutorials/move-wordpress-website-to-new-domain/
If you’re switching to a new domain please refer to the following link to make sure that all the necessary steps are taken - http://www.wpbeginner.com/wp-tutorials/how-to-properly-move-wordpress-to-a-new-domain-without-losing-seo/
RELATED LINKS:
Get your latest WordPress copy here - https://wordpress.org/
Reach out to the worldwide WordPress community - https://codex.wordpress.org/
Connect your Domain name to your Hosting account - http://www.rightmixmarketing.com/wordpress-cms/how-to-connect-domain-name-hosting-account/
2.3 Installing the Bridge theme
When you purchase an item from Themeforest you get a download tab:
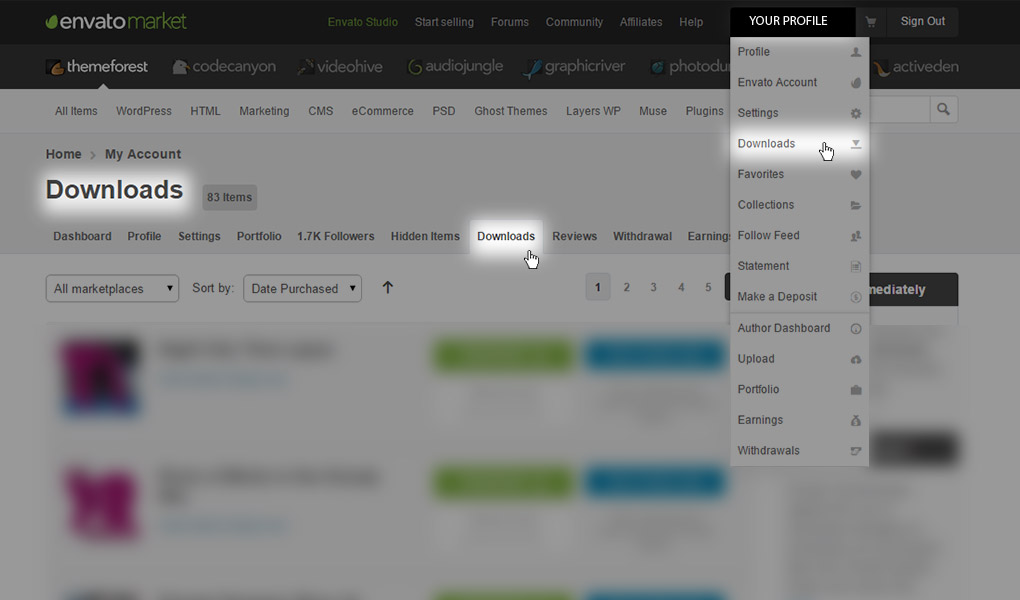
There you can see all your downloaded/purchased items. Select to download the Bridge theme.
There are two methods of installing a theme onto your WordPress site. You can use the WordPress Admin panel to upload and install Bridge, or you can use FTP software instead.
After you’ve downloaded Bridge from ThemeForest you will see this zipped archive in your file manager

Extract the contents of this zipped archive into a new folder called Bridge

Now, you’re ready to install Bridge on your site!
2.3.1 WordPress theme installation
To install Bridge directly from the WordPress admin panel please first log-in to your site’s back-end:
01 Navigate to WP Admin -> Appearance -> Themes.
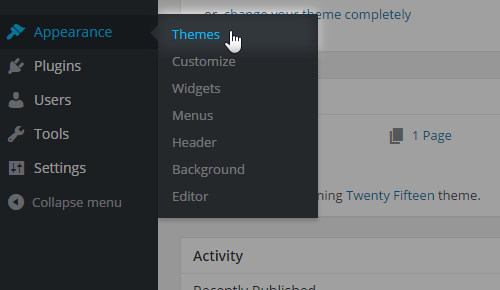
02 Click Add New.
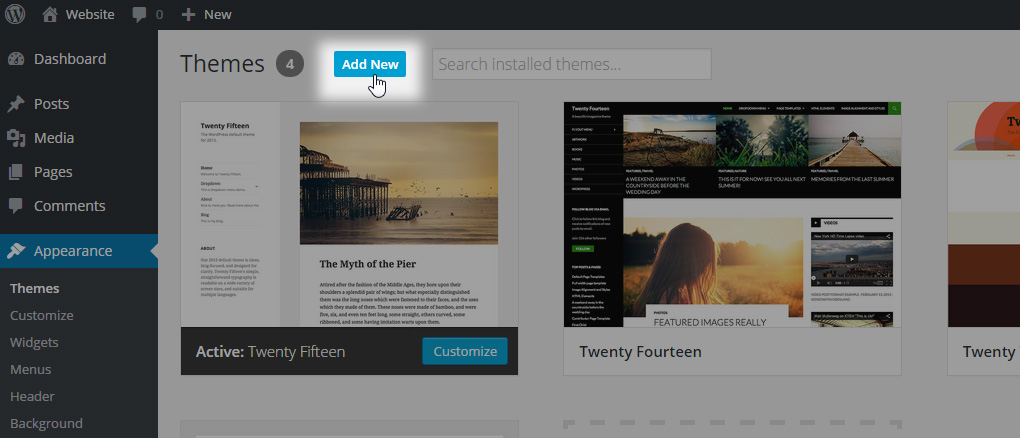
03 Click Upload Theme.
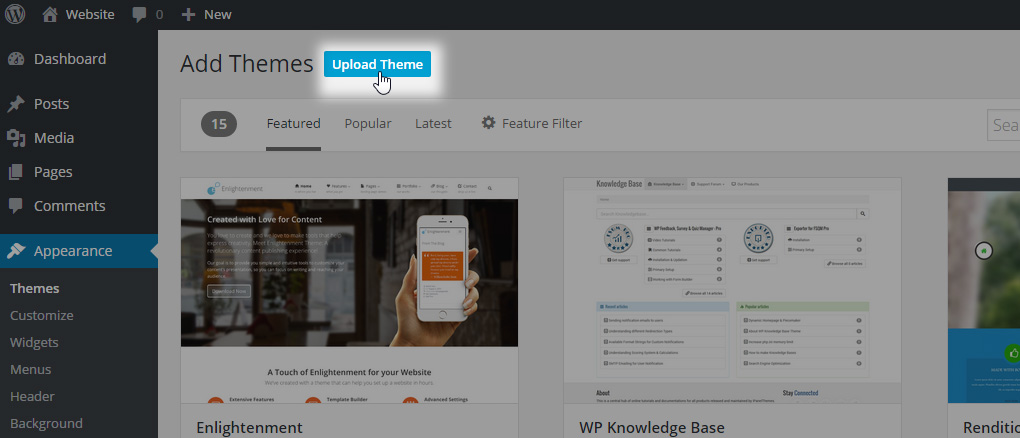
04 Click Choose File.
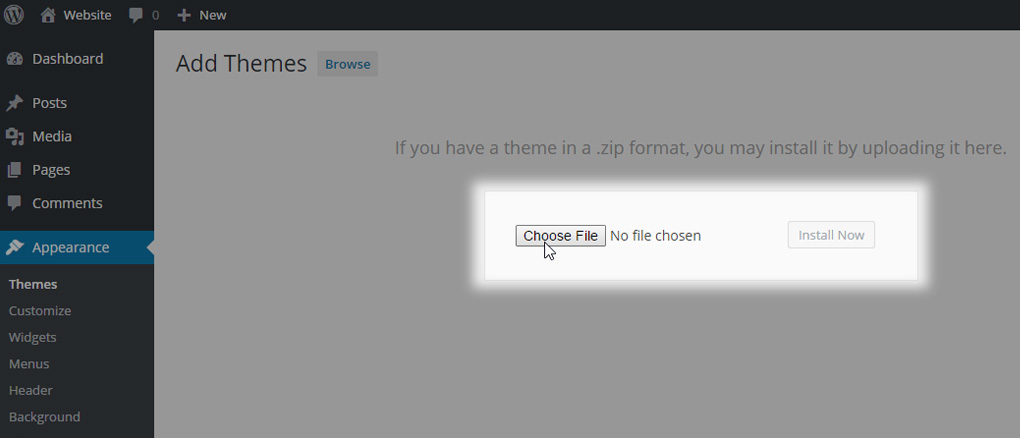
05 Find the bridge.zip file in the folder where you’ve extracted your whole ThemeForest download. Upload this file.

06 Click Install Now and the installation will begin. You can monitor the installation process in the lower left corner of your browser.
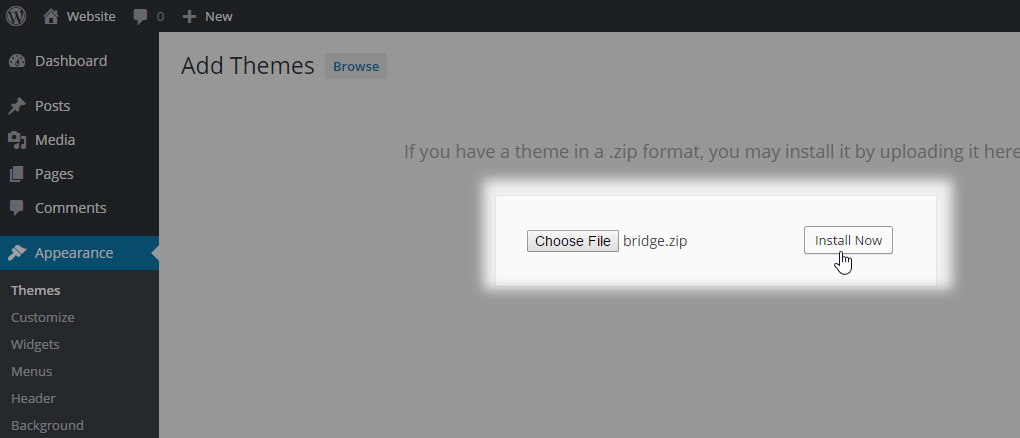
07 Once the installation is complete you will see the following screen:
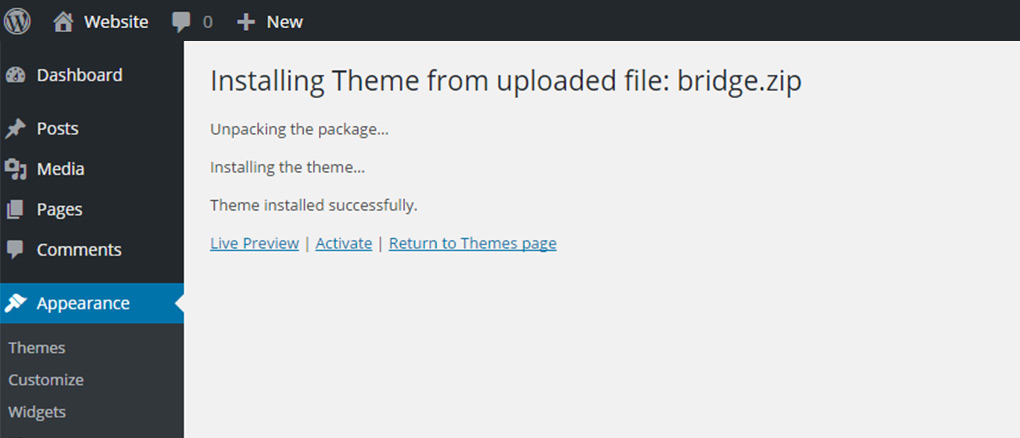
Now that you have Bridge installed on your WordPress site you need to activate it so that the theme gets included in the WordPress CMS and gets rendered on the front-end.
To do that, either click activate when the installation is complete
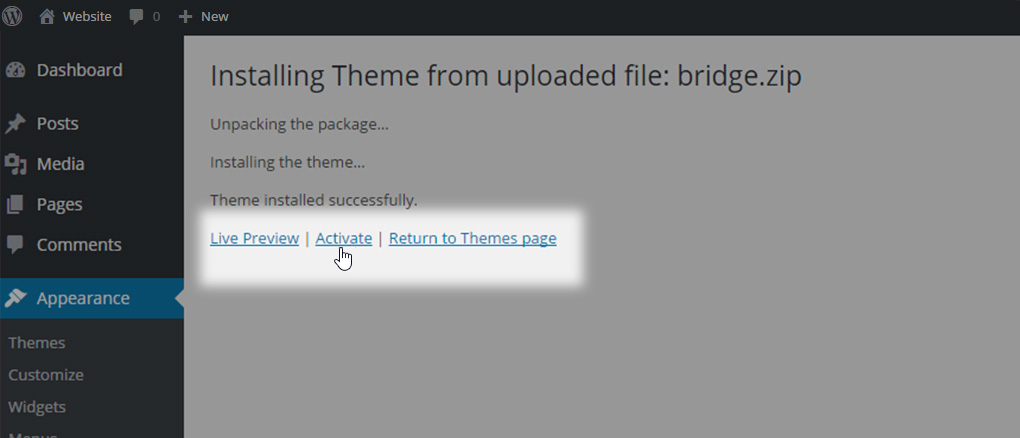
or navigate to WP Admin -> Appearance -> Themes and activate Bridge there
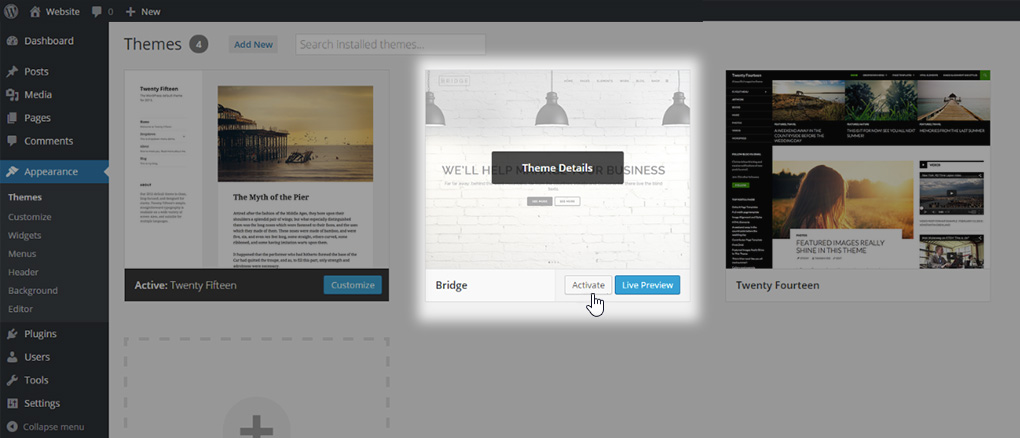
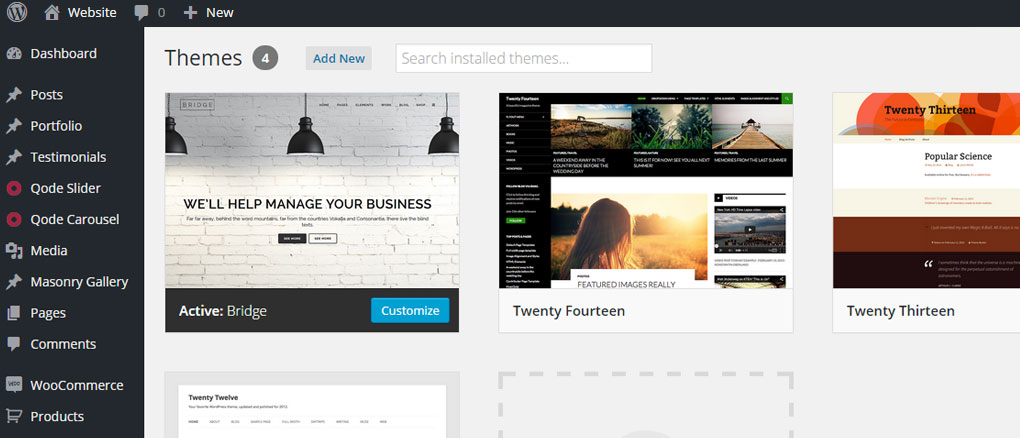
Congratulations! You’ve successfully installed and activated Bridge - Creative Multi-Purpose WordPress Theme on your website. Proceed to install plugins and either add your own content or import the demo content to get your site up and running in no time.
RELATED LINKS:
- Installing a Child Theme
2.3.2 FTP Installation
To install Bridge using FTP software, log in to the server where your WordPress website is hosted.
First extract the "bridge.zip" file that you received in your installation pack. After it is extracted you should see a folder named "bridge". Now connect to your server via FTP and navigate to the /wp-content/themes/ directory under your WordPress website's root location. Upload the bridge folder to the themes folder on your remote server.
RELATED LINKS:
2.3.3 Common Issues and Troubleshooting
In this section we will describe the most common errors that can occur when installing the Bridge theme, and provide solutions for each one.
2.3.3.1 Broken theme and/or stylesheet missing
An error message while installing or activating a WordPress theme usually means:
- The incorrect file(s) were uploaded
- The item you have purchased is not for WordPress
The exact error message may vary, however it will typically include the words, 'Broken Theme' or 'Stylesheet Missing’. A similar message will appear if you’re using a plugin that has minified all the CSS files, including the theme’s or child theme’s default style.css file, which should be left intact according to WordPress regulations.
More about this error and how to fix it - here.
2.3.3.2 Are you sure you want to do this? Please try again
This message means that the import files are larger than the maximum file upload size allowed on your server. Please increase that limit by contacting your hosting provider to perform this adjustment on your behalf, or try to do it yourself as described in this article
We recommend setting Max Upload Size to 35M or higher.
An alternative way to solve this would be to install the theme by uploading files manually via FTP.
2.3.3.3 Blank dashboard – white page
This issue is most commonly related to WordPress memory limit and its value being too low on your server. Please read this article and increase the WP memory limit.
If the issue persists upon adjusting the WordPress memory limit, we recommend enabling WordPress debug mode to track down the cause of this error and resolve it. To enable debug mode, please go to the WordPress installation folder on your server using FTP software and open the wp-config.php file in a text editor. Find this line of code:
define('WP_DEBUG', false);
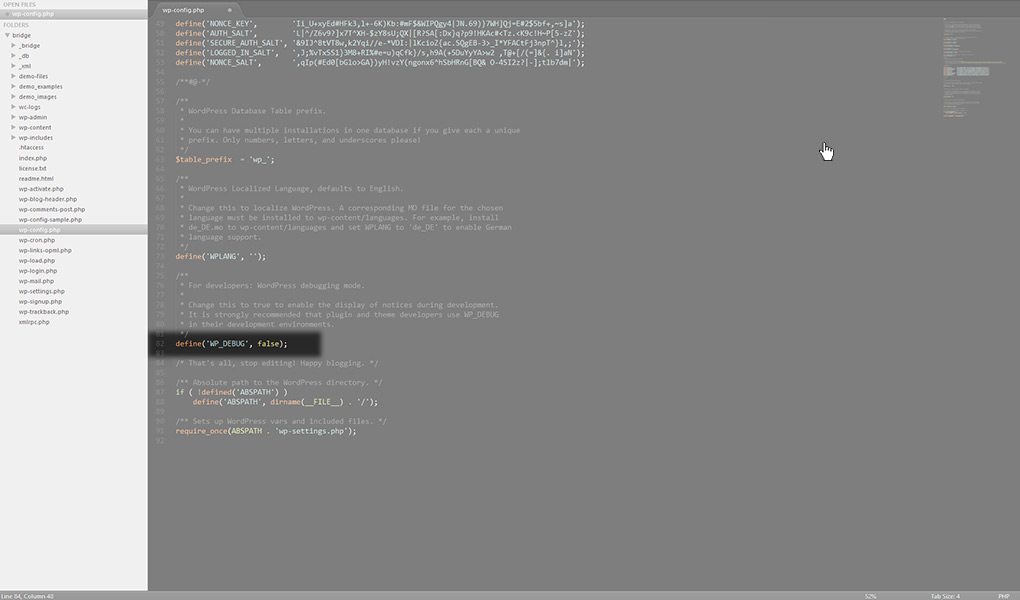
Adjust the code so that WP_DEBUG is set to true:
define('WP_DEBUG', true);
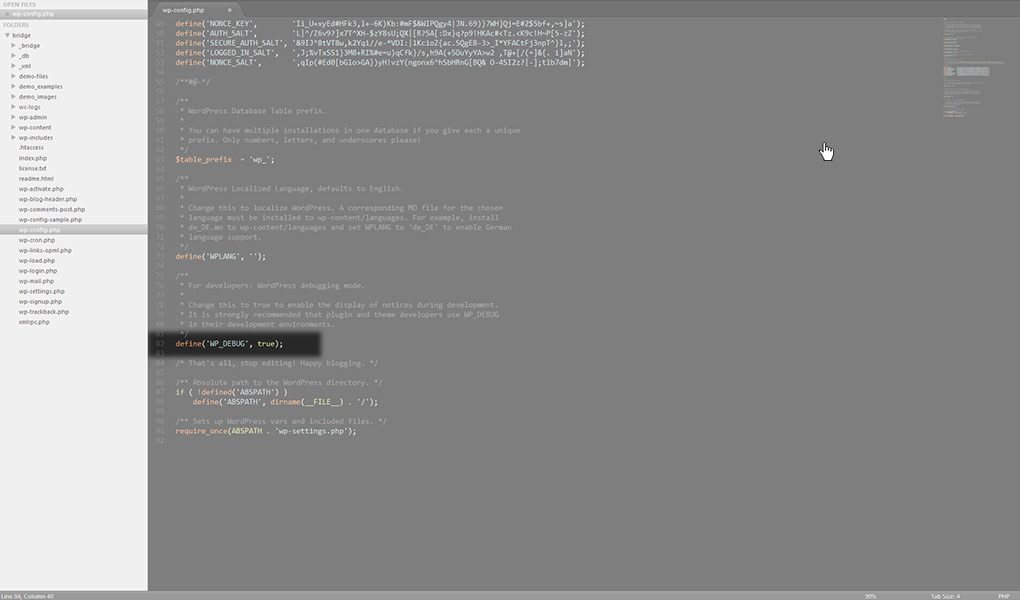
Save the file, re-upload it back to your server and check for issues. Submit the results to our support team https://helpcenter.qodeinteractive.com/hc/en-us for further assistance.
RELATED LINKS:
2.3.4 Theme Update
You can update Bridge manually or by using the Auto Update feature (available since Version 6.4 – March 13th, 2015).
2.3.4.1 Manual Theme Update
01 Download the latest All files & documentation file from ThemeForest (your Downloads page)

02 Extract the contents of your download and locate the bridge.zip archive
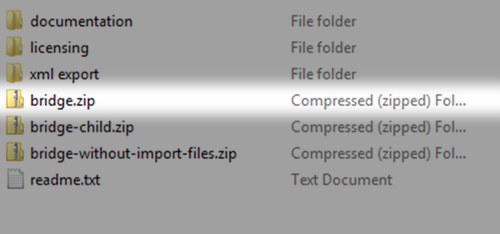
03 Extract the contents of bridge.zip into a folder on your computer, then locate the bridge folder and open it.
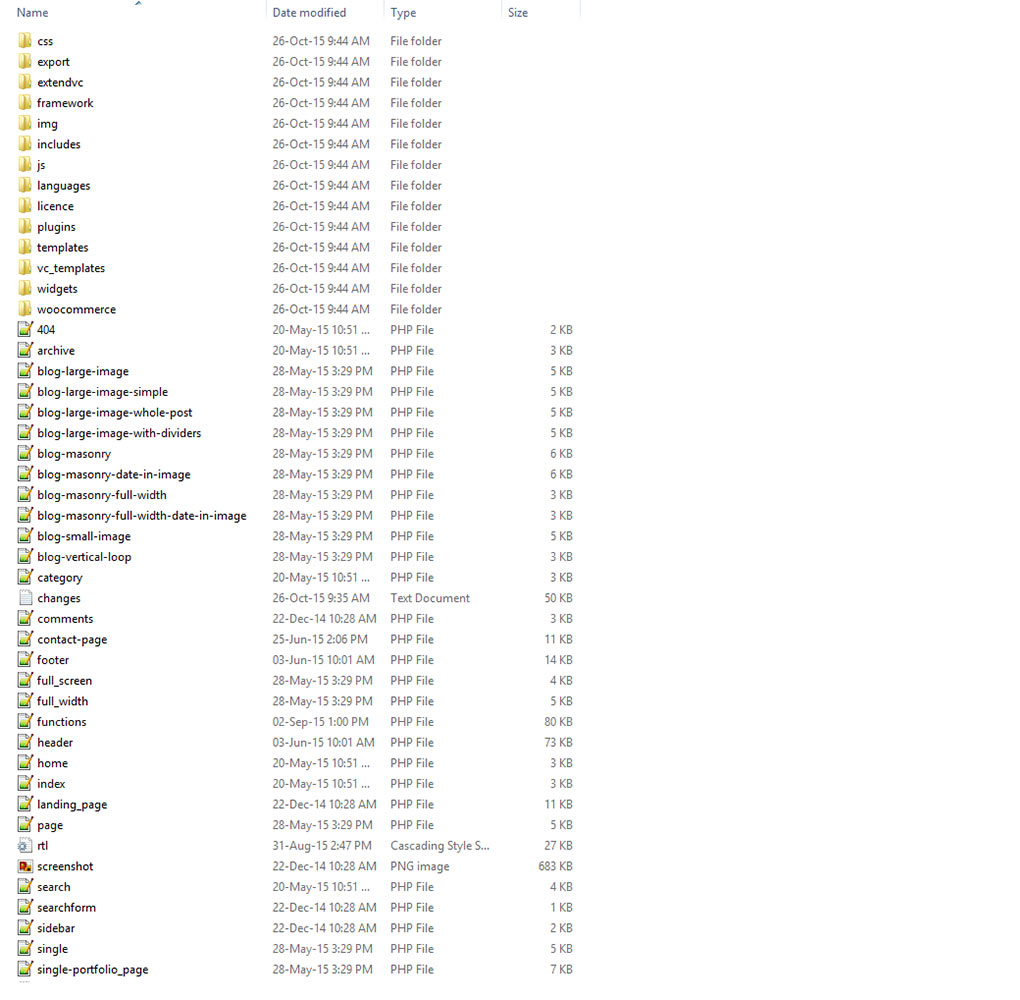
04 Copy & paste the contents of the bridge folder into: /wp-content/themes/bridge – the theme folder of your website, using FTP software. Using this method, none of the existing content or settings will be lost.
Important note: Please note that all changes made directly within theme template files (additional PHP coding and template modifications) will be lost upon theme update. That is why we recommend using a child theme when making changes in theme files, in order to avoid losing these changes or having to re-do them each time you update your theme.
2.3.4.2 Auto Theme Update
To use the auto-update feature, first make sure that you have the Envato Market plugin installed. If you haven't already installed this plugin, you should see a notification on the top of your Dashboard stating that some required plugins haven't been installed or activated. Install and activate all of the required plugins, including the Envato Market.

After you have installed and activated the Envato Market, a new menu item - ‘Envato Market’ - will appear in the admin sidebar.
Please go to ‘Envato Market’ from your admin dashboard and enter your Marketplace Username and API Key. You can find your API Key by logging into your profile on Themeforest and navigating to Profile -> Settings -> API Keys.

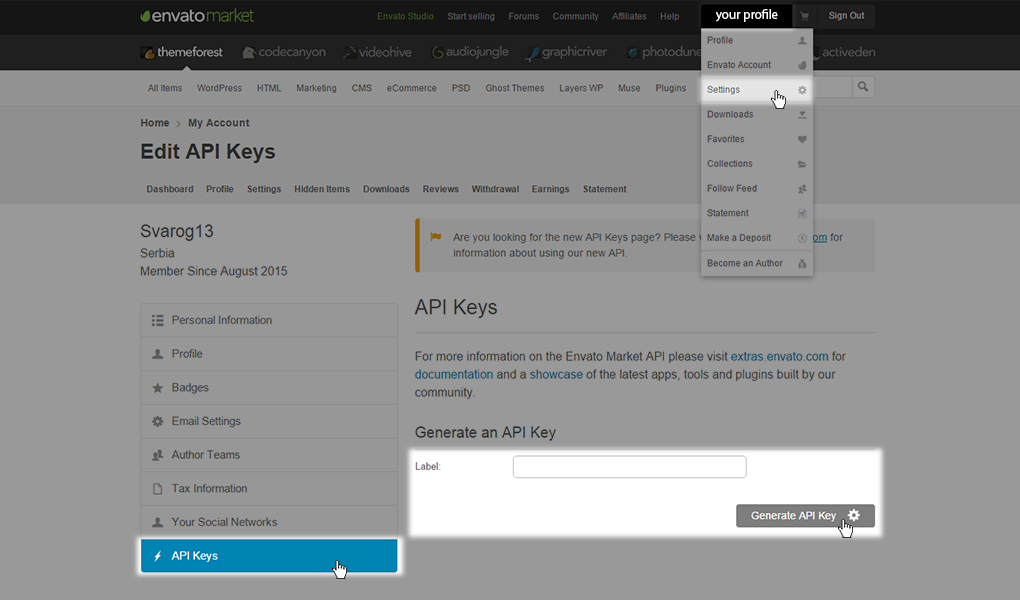
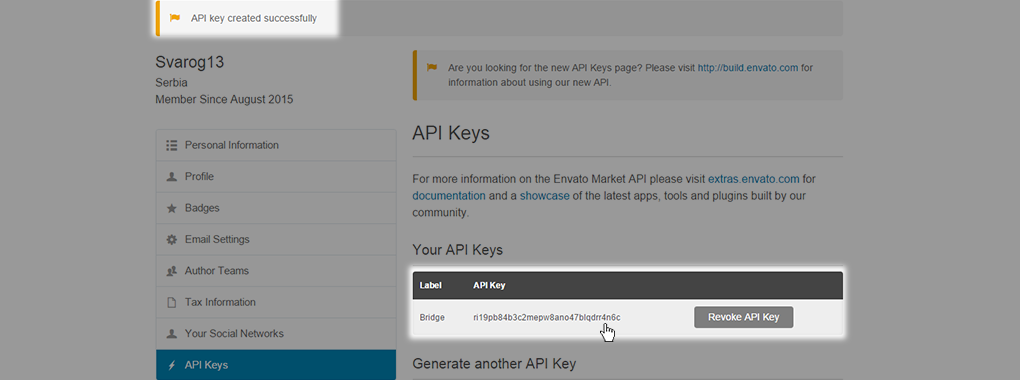
When you have entered your Marketplace Username and API Key, and clicked Save Settings, a new tab will appear at the top of the screen named ‘Themes’. Click on this tab to see all the themes you have purchased. If there is an update available for a theme, you will be notified here. To update your theme, just click on the ‘Update Automatically’ link. This means you don’t have to log in to Themeforest to check for theme updates – you can quickly, easily, and automatically update your themes directly from the WordPress Admin panel instead.
Important note: In order to have your theme properly updated you need to activate the parent theme on your WordPress website. To do that, please navigate to WP Admin -> Appearance -> Themes, select Bridge, and activate it
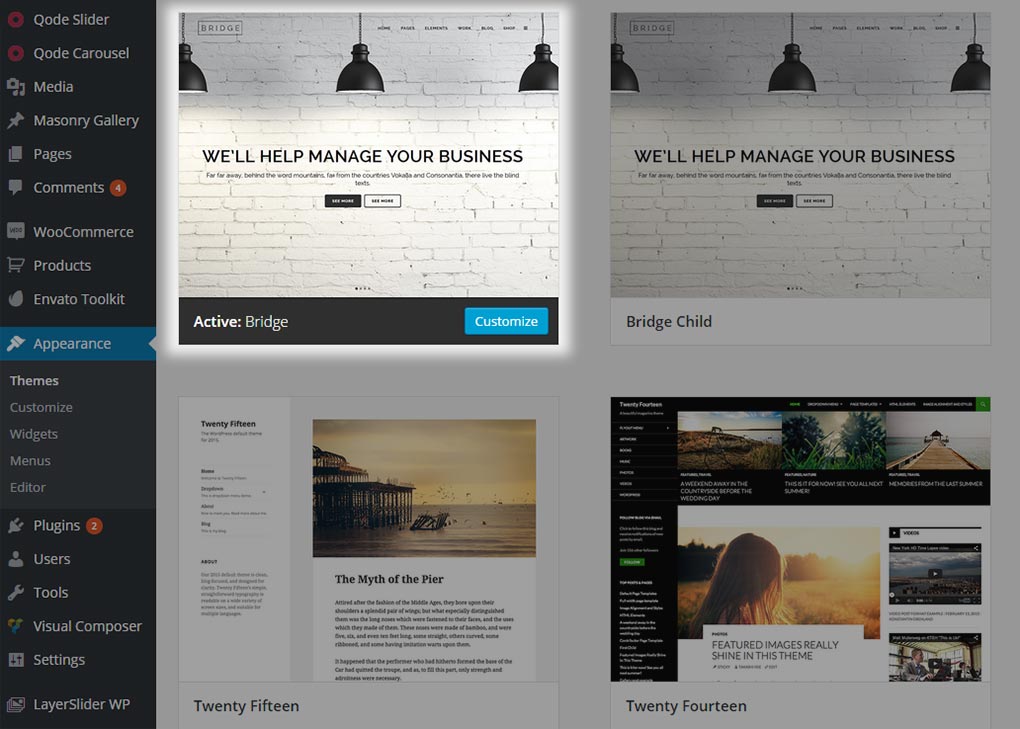
Please note that each time you use the Auto-Update feature to update the theme, a backup file of the old version of the theme will be stored on your server in ‘.../wp-content/envato-backups’.
The toolkit settings page also allows you to install themes that you haven’t already uploaded to your site, delete the ones you don’t use, and view version details.
RELATED LINKS:
2.4 Installing Plugins
The following section will refer to installing and updating required plugins, as well as troubleshooting issues you might encounter. Our theme supports WooCommerce, Contact Form 7, Gravity Forms, WPML and Codestyling Localization plugins, and we’ll cover their basic setup here as well.
2.4.1 Installing Required Plugins
Once you have WordPress and the Bridge Theme installed, you’re required to install the necessary plugins to successfully run our theme on your website (WPBakery, Envato Toolkit and LayerSlider).
Important note: Starting from the Bridge update 18.0, please make sure to install the ``Bridge Core`` plugin, since this plugin is of critical importance for proper theme functioning. This plugin includes core theme functionalities and custom post types that come with the theme (Portfolio, Testimonials, etc.), and without this plugin you will not be able to create any of these custom post types or the elements in the theme that require them. To achieve this, either navigate to Plugins > Installed Plugins, and activate the “Bridge Core”, or alternatively go to Appearance > Install Plugins, and install and activate the “Bridge Core” from there. Additionally, after installing future Bridge theme updates, the “Bridge Core” plugin may require manual updating, which you can perform by locating the plugin in Plugins > Installed Plugins.
Upon installing and activating Bridge in WP Admin -> Appearance -> Themes you will get a notice at the top of your admin panel saying that the theme requires certain plugins. Click on Begin installing plugins.

WordPress redirects you to the Install Required Plugins page. Select all plugins, choose Install and click Apply.

Once the installation is complete the following screen will appear. Click Return to Required Plugins Installer in order to activate these plugins and have them included into the Bridge theme.

Note: LayerSlider is a recommended plugin. Meaning that, if you’re not using a demo of our theme that has incorporated this plugin, or you’re not going to use this plugin when creating your own content, you can omit its installation and save space on your server.
Back on the Installed Required Plugins page, select all the installed plugins, choose Activate, and click Apply.


Click Return to Dashboard.
Congratulations! You have successfully installed the plugins required to run the Bridge theme on your site. Proceed to import a demo, take a look at our quick setup guide, or create your own content.
Regardless of the fact which demo you are using, you can easily upload and activate any of the plugins which comes with Bridge (e.g. Qode Listing, Qode Music, Qode News, etc.). To achieve this please navigate to Plugins > Add New, where you will see an Upload Plugin button at the top left of the screen. After this you should click the Browse button.

Next you should locate the plugin you are looking for. The plugins can be found by navigating to Bridge Main Files folder and extracting the contents of the bridge folder. Here you will find the plugins folder with zip files containing each of the plugins. Simply pick the plugin you wish to upload.

A few moments later the upload process will have finished and you will see the Install Now button next to the plugin in the admin.

After a short while the installation process will have finished as well and all that’s left is to click the Activate button. This rounds up the entire process and you’re all set.
RELATED LINKS:
2.4.2 eCommece: Installing WooCommerce and Setting Up Shop Pages
WooCommerce is one of the most popular WordPress eCommerce plugins that lets you transform your website into an eStore and enables your site visitors to shop online. This plugin is fully compatible with the Bridge theme, including complete design integration and numerous WooCommerce shortcodes ready for use within WPBakery.
Note: If you plan to use the shop, please install WooCommerce before you import any demo content. Otherwise none of the WooCommerce demo files will get included into your site’s content.
To install WooCommerce please follow these steps:
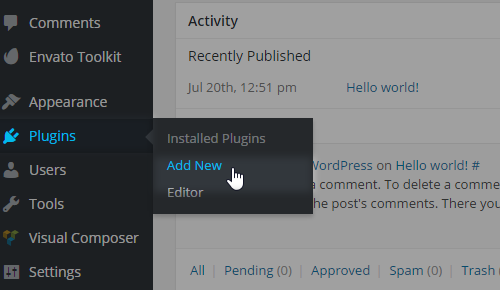
01 Navigate to WP Admin -> Plugins -> Add New
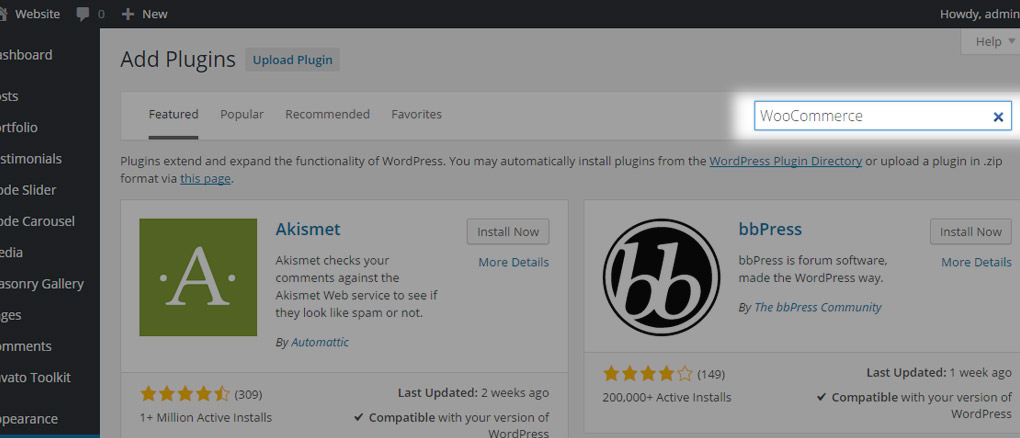
02 In the Add Plugins window use the Search Plugins field, type WooCommerce and press Enter to start searching
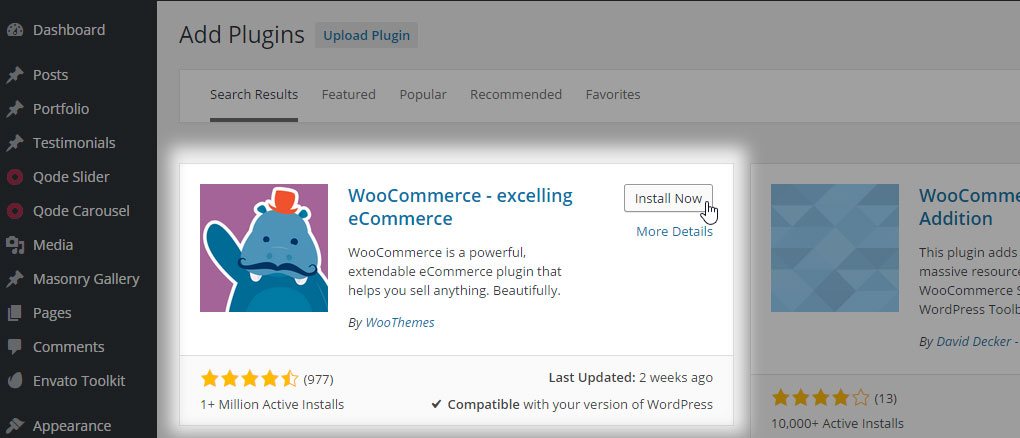
03 Find WooCommerce - excelling eCommerce and click Install Now
04 After the plugin has been installed, click Activate Plugin
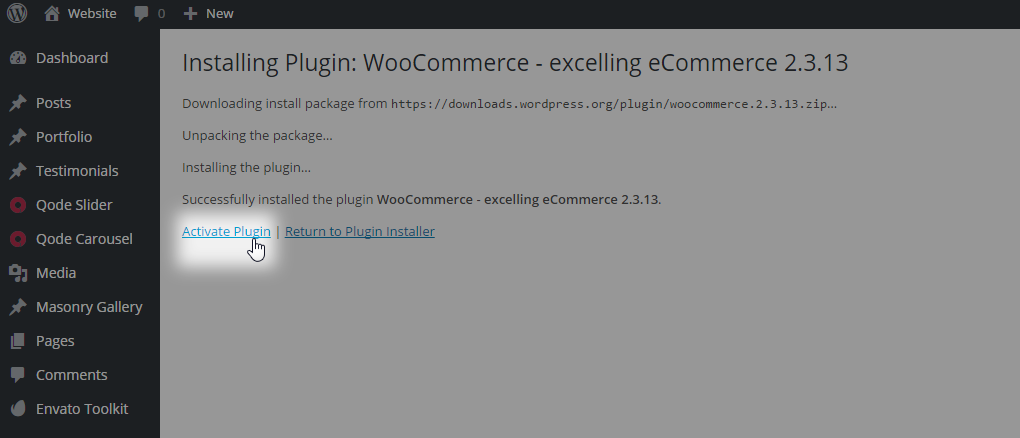
05 Finally, you will see a notice saying ‘Welcome to WooCommerce.You're almost ready to start selling :)’. If you plan on importing Bridge demo content, click on Skip Setup. Otherwise, click Install Pages
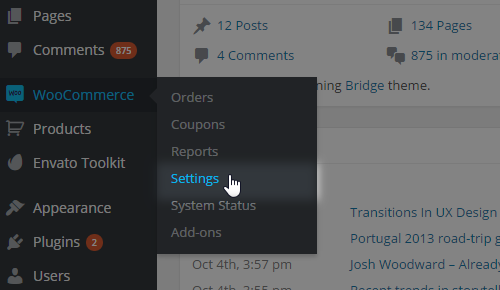
Note: If you plan on importing demo content, you should first set product image sizes in order to achieve the same layout you see on our demos. To do that, please go to WooCommerce - > Settings and click the Products tab. Under the Display section set the Product Images sizes to the following values:
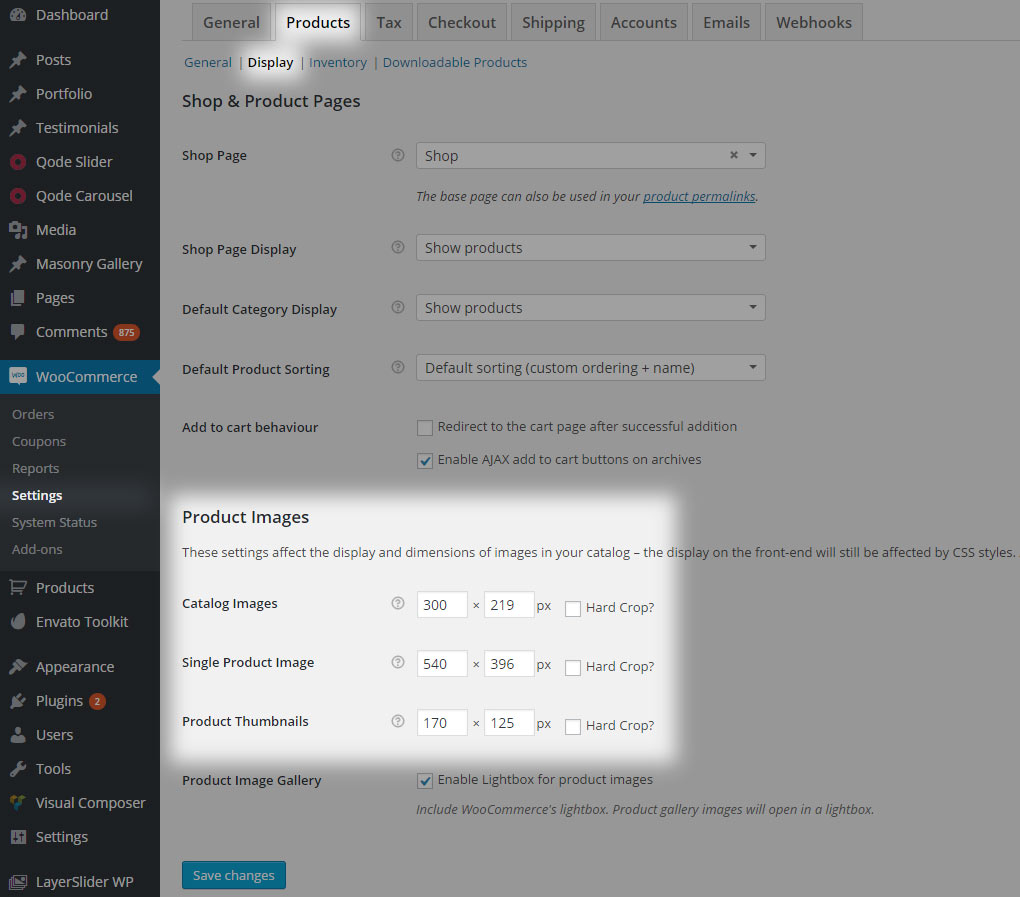
Note: To modify product image sizes at a later date, you should regenerate thumbnails in order to have the new sizes take effect.
If you’ve imported Bridge demo content and the WooCommerce plugin was initially disabled, then you need to go to WP Admin -> WooCommerce -> System Status -> Tools -> Install WooCommerce Pages and click Install Pages.
Next, navigate to WP Admin -> WooCommerce -> Settings -> Product -> Display -> Shop Page. Set your main shop page here and save.
Then, navigate to the Checkout tab under the same section and under the Cart Page and Checkout Page option fields set these two pages, respectively.
Similarly, repeat these steps in the My Account tab in the My Account Page option.
Finally, go to WP admin -> Pages -> Shop page and set the WooCommerce template for that page, and save it. Now your shop is ready.
RELATED LINKS:
2.4.3 Creating Forms pt1: Installing Contact Form 7
Besides having a built-in Contact Page feature, Bridge enables you to create forms for various purposes easily with the help of Contact Form 7 – directly from your admin panel.
To install Contact Form 7 please follow these steps:
01 Navigate to your WP Admin -> Plugins -> Add New
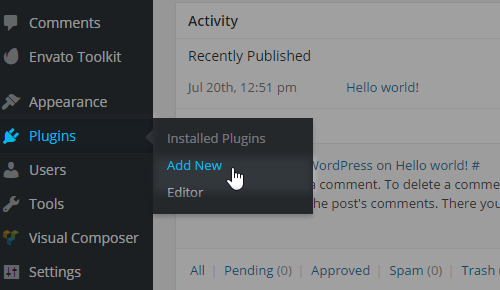
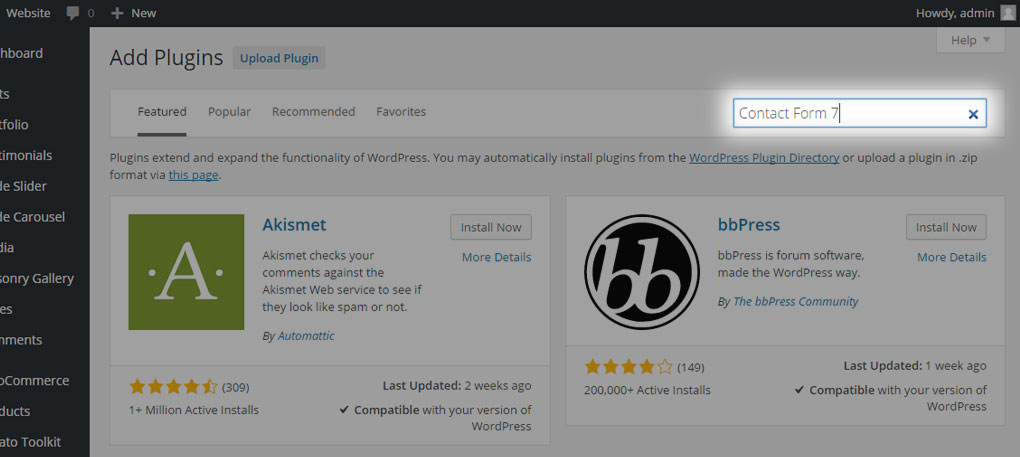
02 In the Add Plugins window type Contact Form 7 in the Search Plugins field, and press Enter to start searching
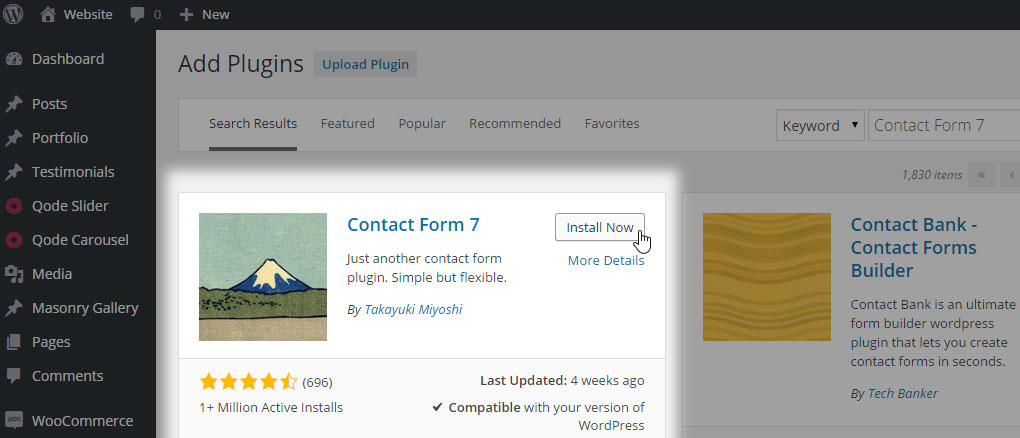
03 Find Contact Form 7 and click Install Now
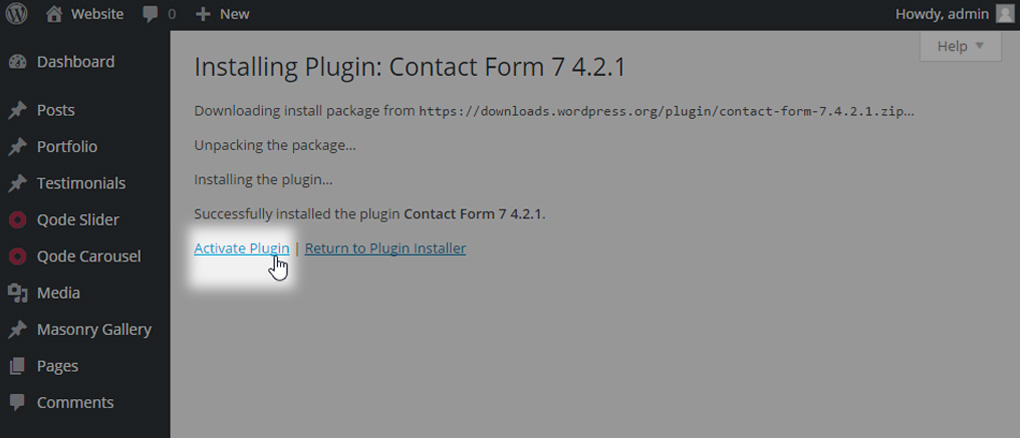
04 After the plugin has been installed, click Activate Plugin
To get more familiar with using this plugin and setting up forms on your site, please refer to: https://wordpress.org/plugins/contact-form-7/
Note: For more information on defining Contact Form styles, see Qode Options - > Contact Form 7.
Forms: 3rd Party Integration
If you’re looking for integrating a newsletter sending service, you need to additionally install a plugin called ‘Forms: 3rd-Party Integration.’ You can get more familiar with this plugin’s features at the following link: https://wordpress.org/plugins/forms-3rdparty-integration/.
Once you've completed the installation process and activated this plugin, navigate to Contact -> 3rdparty Services from the WordPress Admin panel in order to set options. For more information on setting up newsletter service, please have a closer look at the following link: https://wordpress.org/plugins/forms-3rdparty-integration/screenshots/.
RELATED LINKS:
2.4.4 Creating Forms pt.2: Installing Gravity Forms
Gravity Forms is a plugin that lets you quickly build and design your WordPress forms using the form editor. Bridge is fully compatible with this plugin.
You can find installation instructions in the documentation section of the author’s website, at the URL listed below. https://www.gravityhelp.com/documentation/gravity-forms/user-guides/getting-started/getting-started/
RELATED LINKS:
Gravity Forms documentation - https://www.gravityhelp.com/documentation/
2.4.5 Translating Content: Installing WPML
WPML is a premium multilingual plugin that lets you translate your site’s content into a different language. This enables you to have a multilingual website including the option of site visitors selecting the language on the front-end of your website. Please note, this plugin will allow you to have a multilingual site, but you will have to translate content manually. Content in WordPress relates not only to page or post content, but menu items, media library, and other custom post types as well.
After installing WPML plugin and the optional add-on for label translation navigate to WP Admin -> WPML and follow the onscreen instructions to perform the initial setup.
If you are planning on using page transitions within the Bridge theme, please note the following: Since page transitions actually reload the content of the page using Ajax, the header and footer are left intact. This can cause WPML language switcher not to show the correct links if used outside the menu.
Since translating one post/page is basically the same as creating a new one written in a different language, while doing so you can also create slugs for posts/pages in separate languages: https://wpml.org/documentation/getting-started-guide/translating-page-slugs/
2.4.6 Translating Labels: Loco Translate / Poedit
To translate theme labels such as: ‘Sort Portfolio’ and ‘All’ in the Portfolio filter, or parts of the Contact Page template, you will need to modify the theme language files. You can perform these changes by using the Loco Translate plugin or Poedit standalone software. This technique can be utilized not only if you are running your site in a language other than English, but also if you would simply like to change some theme labels. In other words - if you just want to change some existing label into a different string, eg. to change read more into continue reading.
2.4.6.1 Using Loco Translate
You can use the Loco Translate plugin to translate theme labels. To install and start using the Loco Translate plugin, please follow the steps below:
01Navigate from your WP Admin to Plugins -> Add New
02 In the Add Plugins window type “Loco Translate” in the Search Plugins field, and press “Enter” to start searching
03Find Loco Translate and click Install Now
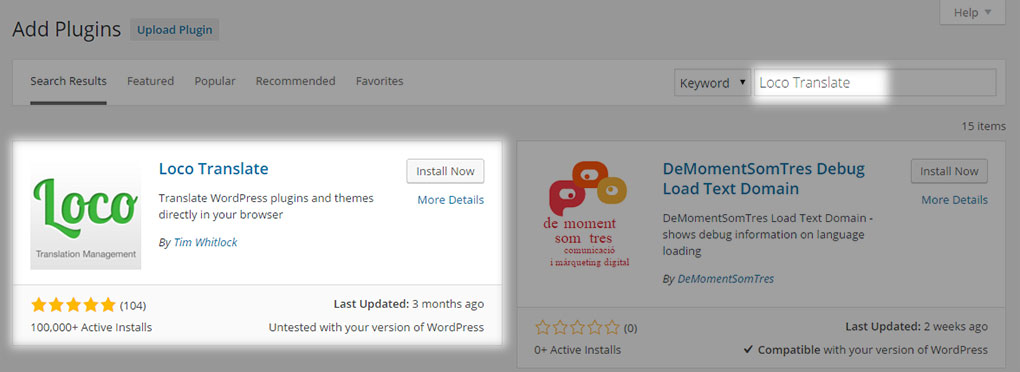
04After the plugin has been installed, click Activate Plugin
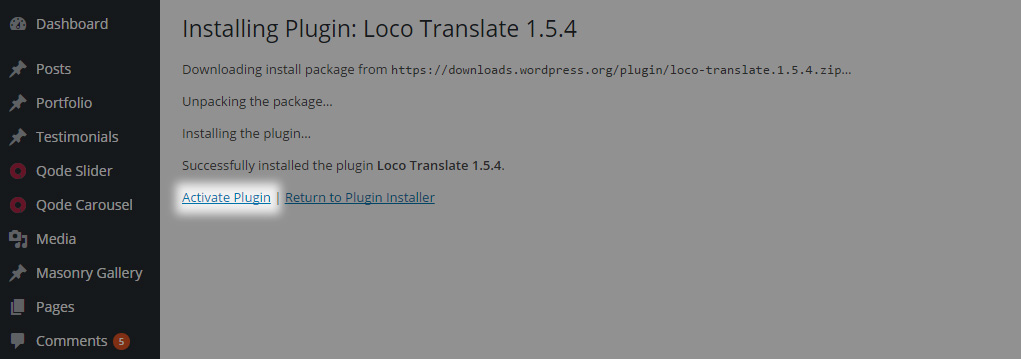
To get more familiar with using this plugin and setting up translations on your site, please refer to: https://wordpress.org/plugins/loco-translate/
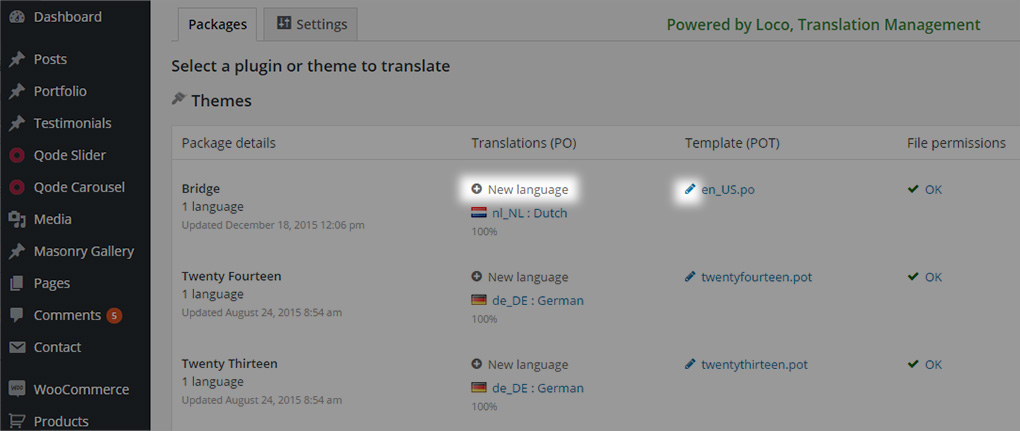
05 Navigate from your WP admin to Loco Translate > Manage Translations, click the edit button for an existing language, or create a new translation by clicking on New language next to the Bridge theme
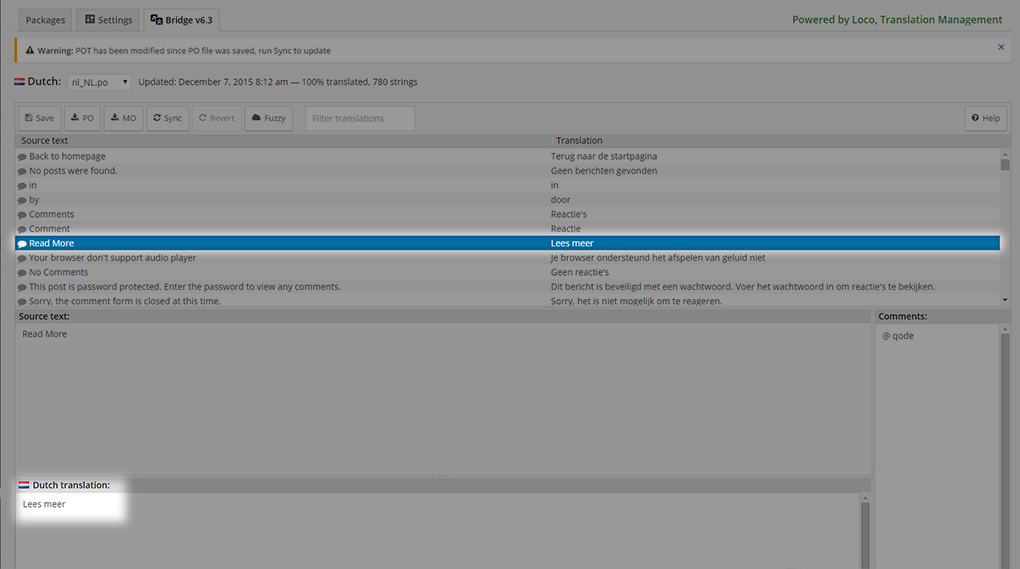
06 Then, go to edit the theme labels and find the phrase you want to change
RELATED LINKS:
2.4.6.2 Using Poedit
Please install Poedit from http://poedit.net/wordpress on your computer. Then run it and import en_US.po file from your theme folder/languages into the program.
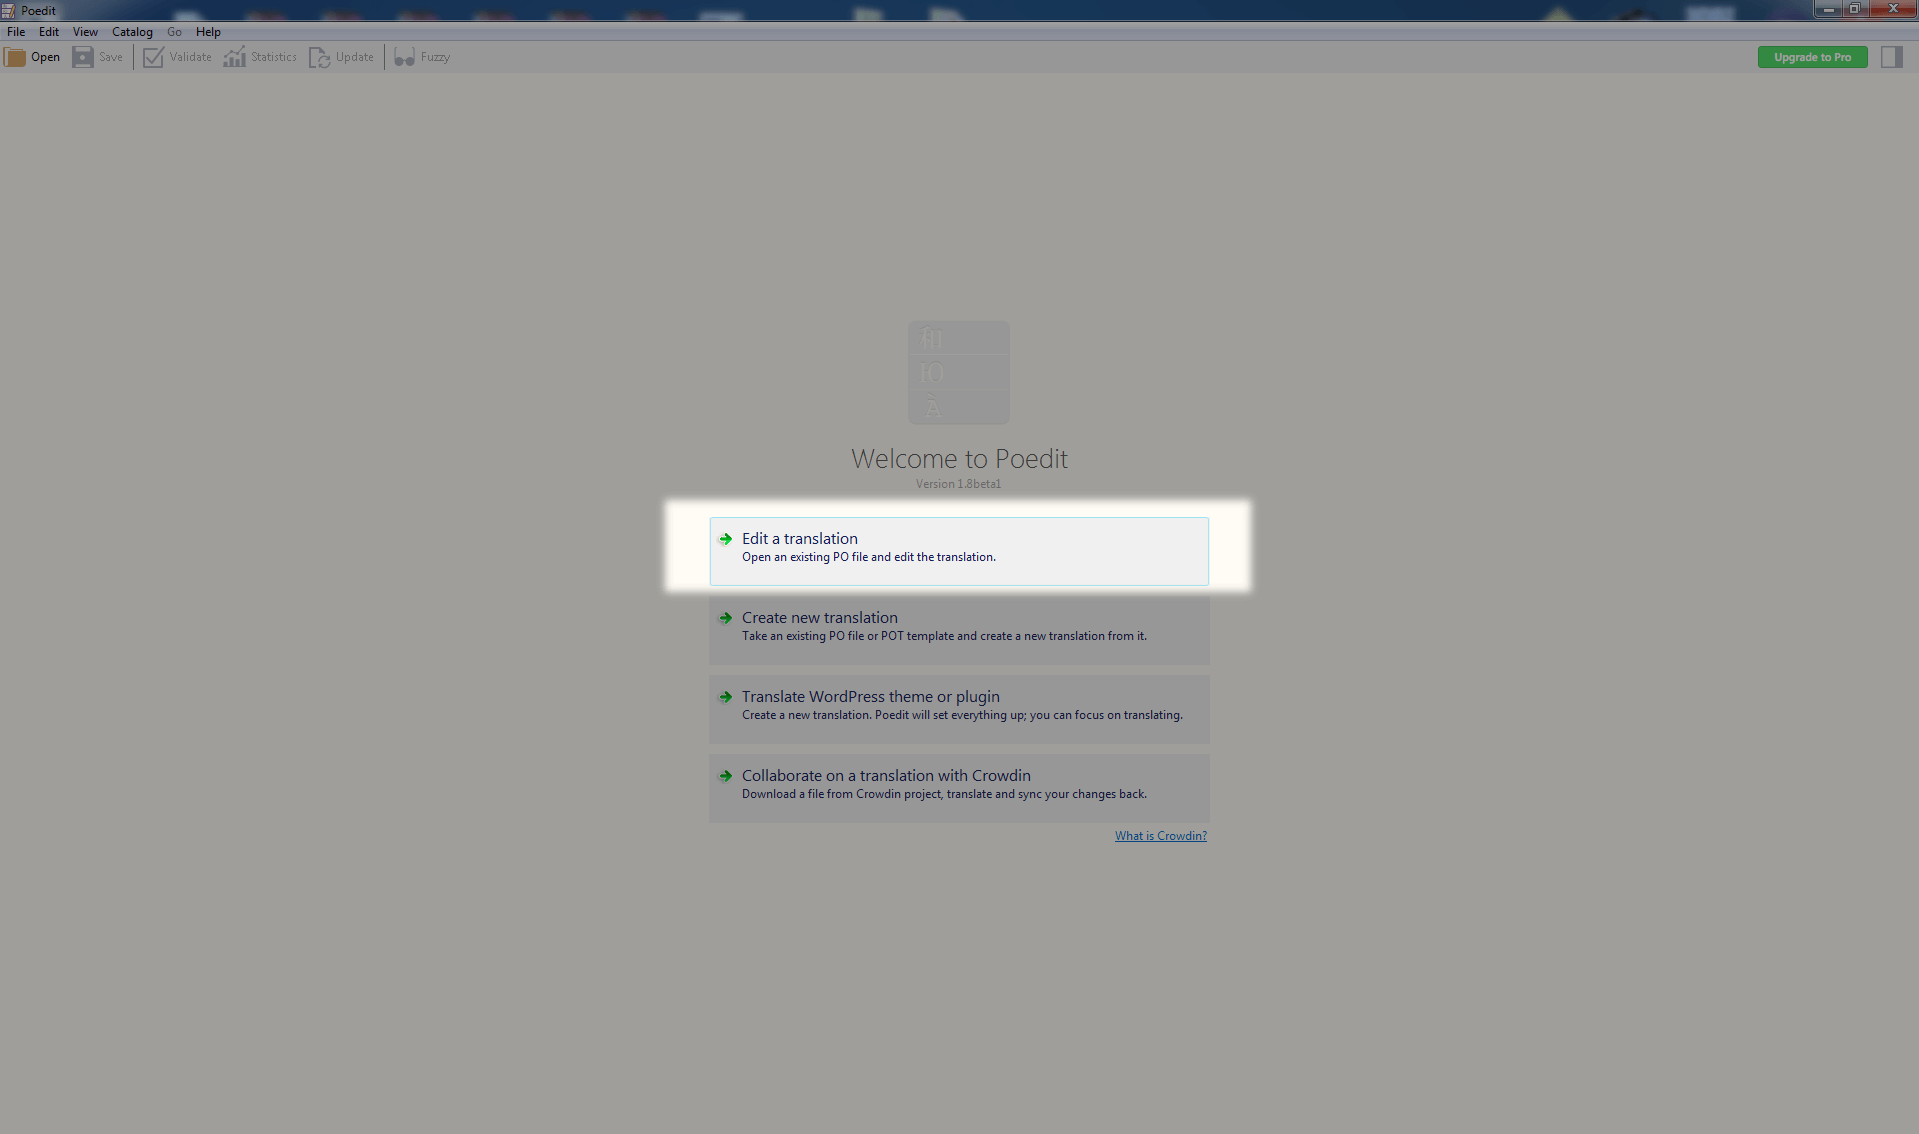
Next translate your labels like in the screenshot and refresh your site.
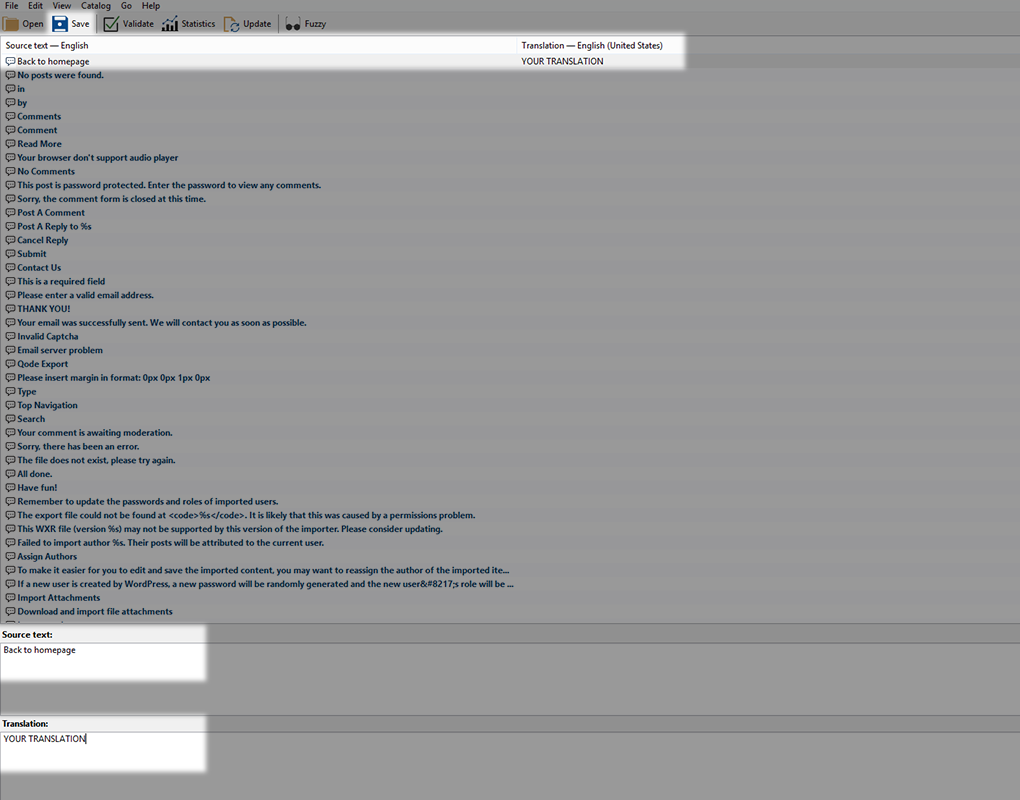
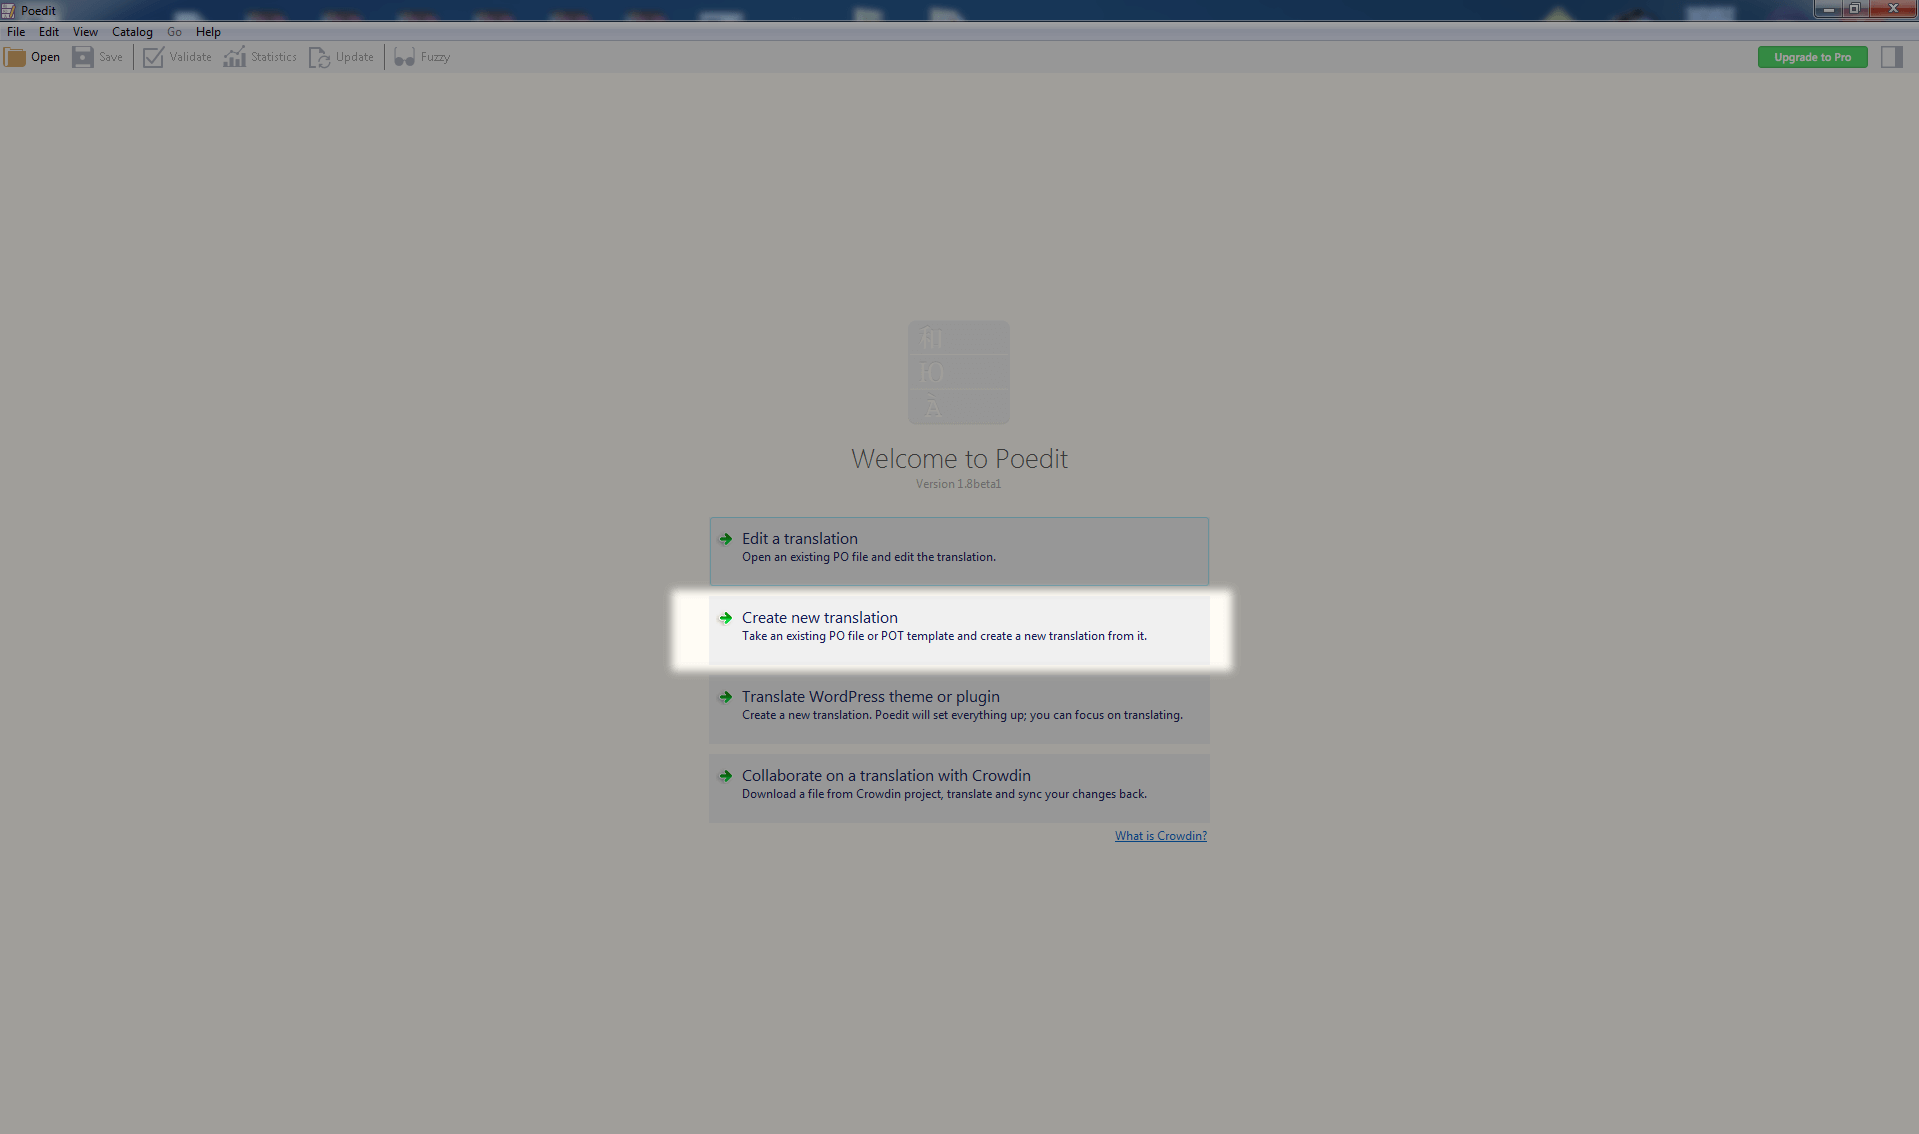
If your site admin is in another language (other than English) then choose to create a new .po file for your language.
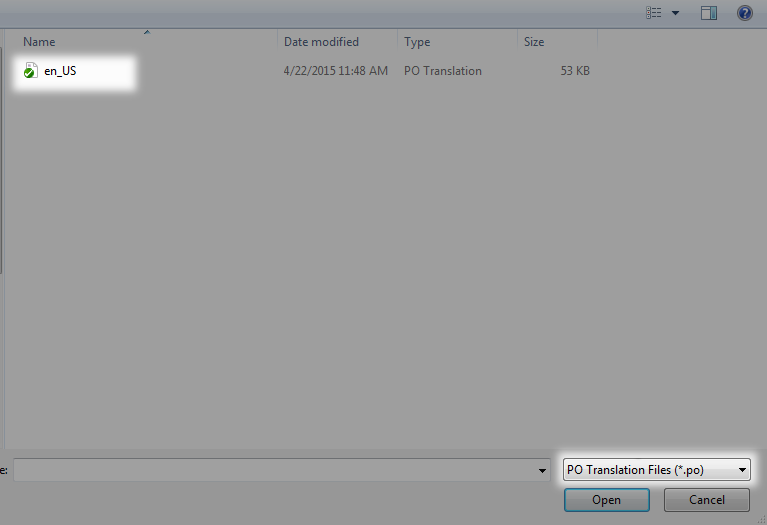
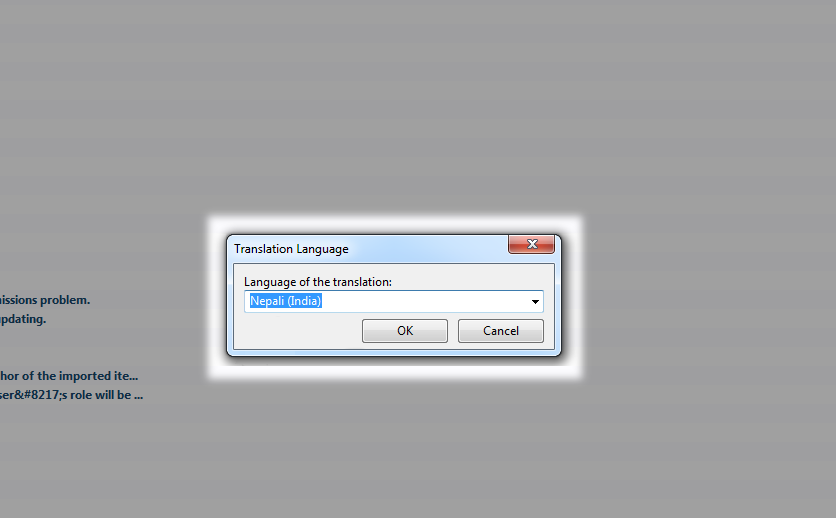
Import the en_US.po or .pot (if it is avaliable) file from theme folder/language and select your new language from the Translation Language dropdown menu and translate like advised previously.
When you've finished translating, upload your newly created .po and .mo files to the languages folder on your live server (saving your file will create .po and .mo files, and it is important to upload both files).
Note: If you don't want to lose changes after a theme update, we recommend that you install and activate a child theme. Then inside the child theme create a folder named language and copy your translation files there. Finally, paste this function into the child theme functions.php file (append to existing content):
if ( ! function_exists( 'bridge_qode_load_child_theme_domain' ) ) {
function bridge_qode_load_child_theme_domain() {
load_theme_textdomain( 'bridge', get_stylesheet_directory() . '/languages' );
}
add_action( 'after_setup_theme', 'bridge_qode_load_child_theme_domain' ); }
RELATED LINKS:
2.4.7 Common Issues and Troubleshooting
If you have experienced issues while installing one of the plugins with the Bridge theme, we suggest that you refer to the following section of the owner’s manual in order to troubleshoot and solve any issues you might have come across.
2.4.7.1 White page
Problem: When installing WPBakery a blank page appears.
This means that you’ve exhausted server memory resources and need to increase the memory limit.
Solution: You can have a closer look at how to increase the PHP memory limit here.
Or contact your hosting service provider and ask them to increase the memory limit on your behalf.
RELATED LINKS:
2.4.7.2 Destination folder already exists
Problem: When installing WPBakery the following message appears:
Destination folder already exists.
/home/gctsai99/public_html/exultmedia.com/wp-content/plugins/js_composer/
Solution: Using FTP software, please navigate to your theme folder/wp-content/plugins and delete the whole folder js_composer.
Then you should go to the WP admin dashboard, and you will see the message :
This theme requires the following plugin: WPBakery Page Builder for WordPress.
Click on Begin Installing plugin.
RELATED LINKS:
2.4.7.3 I’m seeing HTML code on the front-end of my site
Problem: On the front end of your site there’s HTML shortcode instead of images, portfolios, rows etc.
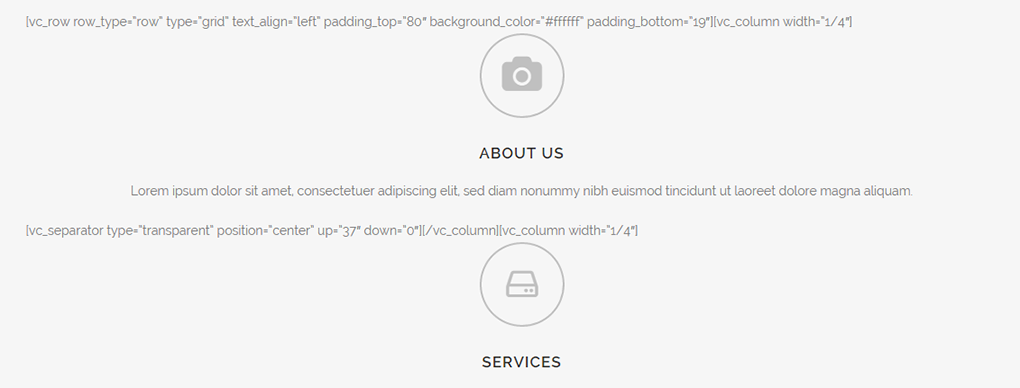
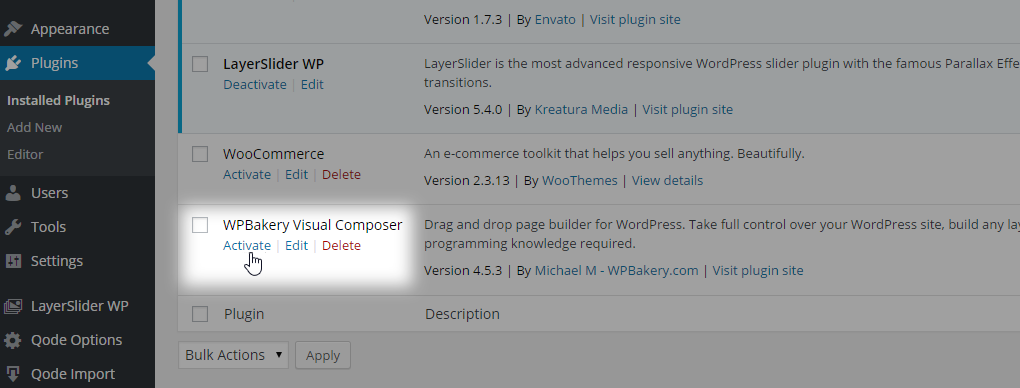
Solution: WPBakery is not activated. Please go to your WP Admin -> Plugins -> Installed Plugins and activate WPBakery Page Builder for WordPress:
RELATED LINKS:
2.4.7.4 jQuery cookie error
Problem: WooCommerce Wordpress plugin fails to load jQuery Cookie Java Script due to current Mod_security ruleset.
Two files (‘jquery.cookie.js’ and ‘jquery.cookie.min.js’), located inside folder /plugins/woocommerce/assets/js/jquery-cookie/ will produce a 404 error which may cause some issues with Order buttons (making it impossible to order), and other minor template issues.
Solution: To solve this issue, please refer to the following URL: https://docs.woothemes.com/document/jquery-cookie-fails-to-load/
If you happen to need any further assistance with installing plugins please refer to our theme support at https://helpcenter.qodeinteractive.com/hc/en-us .
RELATED LINKS:
2.4.8 Updating Plugins
With each theme update comes the latest version of the bundled plugins - WPBakery and LayerSlider.
2.4.8.1 WordPress Update
When you update Bridge theme, please go to your WP Admin -> Plugins and deactivate and delete these plugins.
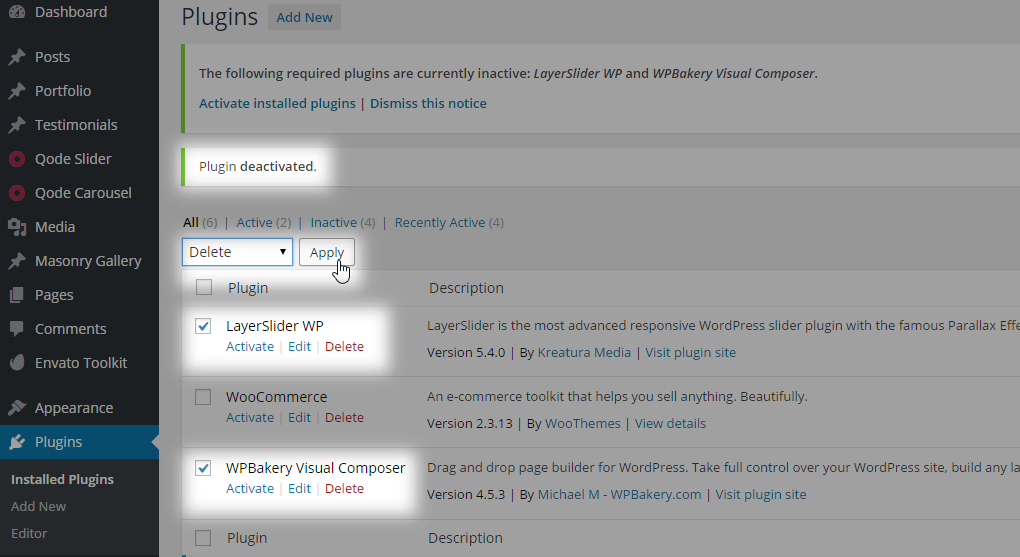
Then you will get a notification that you are required to install the necessary plugins to run our theme. Just click to install/activate these plugins again, and that is all there is to it.
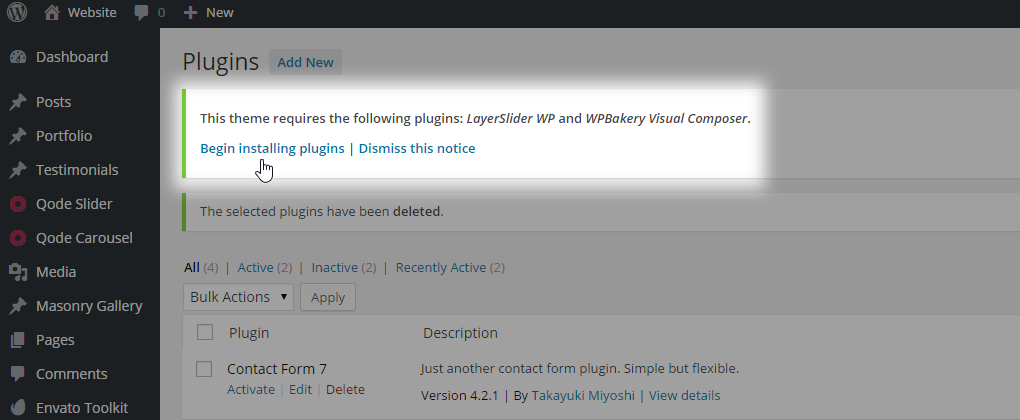
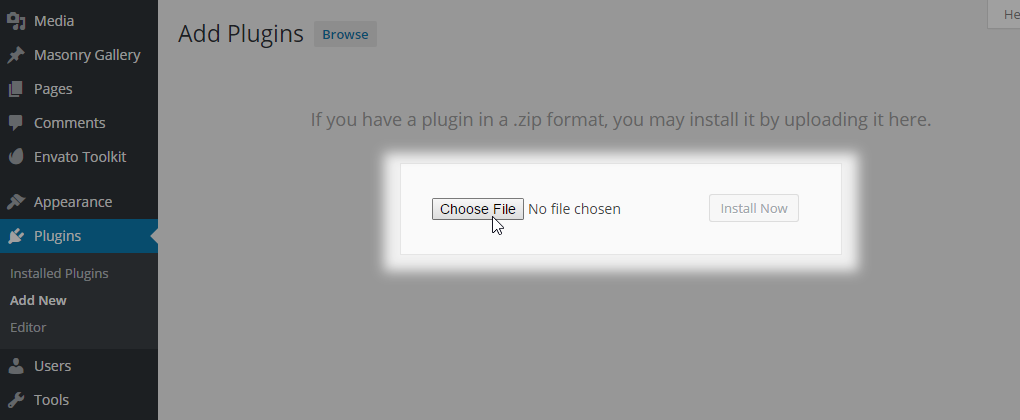
If somehow this plugin installation notice doesn’t appear, please navigate to WP Admin -> Plugins -> Add New -> Upload - Find these plugins in theme folder/plugins, select them one by one and click import/install.
Note: When updating LayerSlider please export your current slideshows and import them back when the update has finished in order to preserve them.
2.4.8.2 FTP Update
You are also able to update required plugins via FTP. You should follow these instructions, as the principle is the same for all required plugins:
01 Navigate to the extracted bridge folder/plugins and extract the folder for plugin which you want to update

02 Connect to your server and navigate to wp-content/plugins and drag and drop the folder with the desired plugin which you have previously extracted

03 That’s it, your plugin is updated.
2.4.9 Plugins Licensing
With our theme comes the extended license for all plugins integrated with it (WPBakery and LayerSlider). We update these plugins to their latest version with every future theme update.
You can ignore the messages about the required activation of these plugins that are visible in the Plugin settings panel.


